Friday, October 28, 2011

Easy DIY Halloween Decorations

This year, I have decided that I'm decorating for the holidays. I mean, REALLY decorating for the holidays. I want our home to feel festive--starting with Halloween! The only problem is, we don't have a never-ending supply of money, so I have to find cheap or free ways to decorate our home. These happened to be free since I already had the supplies lying around the house. 


First, we have spooky ghosts and bats! We made about 15 of these to hang around the house. 


I went online and found a free coloring sheet with the kind of bat & ghost I wanted. I had to adjust the size a little bit to make them larger. 
I used a heavy piece of cardboard (not the corrugated kind) to cut them out of. 
We painted them with washable paint. 


I went back after the kids were done and added a second coat of paint to make them look a little bit darker. 
When they were done drying, I added faces to the ghosts with a sharpie. 
I used an awl and poked a small hole in the top of each one and tied a piece of fishing line to them so we could hang them. 
We hung them in the entryway, living room, hallway & kitchen! 
___________________________________________________________________

Halloween Trees

You can use just about anything to make these and you can make them for any holiday! 


For these, you will need scissors, tissue paper, cardstock, clear tape, and hot glue. 

We'll start with this one:

First, make your cone out of cardstock. 
Tape it in place. 
I just rolled it into a cone shape and trimmed the bottom so it would sit upright. 


Next, I cut the tissue paper into lots of squares. They were about 1"x 1".
Scrunch them up and glue them around the bottom of the cone. 
You can glue them in whatever pattern you like. 

You'll have to excuse the mess....I'm a multi-tasker. 
Keep going up the cone. Glue the tissue paper very closely together.
Try not to let the paper underneath show.
Progress! Keep going....

Viola! Finished!
____________________________________________________________

Now on to the next Halloween Tree!


Make a cone out of cardstock again. 
This time, cut your tissue paper into strips and twist them. 


You're going to start with a 'guide' strip. Glue on your strip in whatever design you want. I went with a crazy random swirl. You want it to go all the way around and from top to bottom. This is going to be the strip you use to guide you as you glue on more. You may have to use more than just one piece of tissue paper, depending on how long you cut each strip. 

Here's my 'guide strip'. 
Notice how it starts on one side and you can see it goes all the way around.

Next, you're going to glue your orange strip right next to it. Follow your guide strip as you glue. 
Keep the pattern going...black, orange, black, orange.


Progress! Keep going!

Keep going until the whole thing is filled up!

Finished!
________________________________________________________

Here is a picture of our Halloween trees and some ghosts and a bat decorating our mantle. 


Thursday, September 22, 2011

What to do next???

I am so torn as to what to create next. I know my blog is titled to be mainly about sewing, but I just love making things with my hands in general. It doesn't matter what type of craft it is. Lately I have been addicted to Pinterest (Look! You can follow me! ---> ).  I have found SOOO many things to do/make/create that I'm almost in overload!

The biggest project that I want to do at the moment, but can't quite get D on board with, is refinishing the kitchen cabinets and painting the walls. Seriously, I could do it myself. I don't need his help. I'm just that darn handy. However, he says it's too much work. :o(  I'm in serious pouty mode right now. I want to paint the cabinets white and the walls a light gray and hang yellow curtains. I am completely in love with gray, white & yellow color palettes. Plus, we have a really small kitchen and I think it would brighten it up a lot. Yes, I know I'm due to have a baby in less than 2 months, but I wouldn't start this project until after Christmas. So if you know me or D personally---help me convince him to let me do it!!!! 

I really want to get our decorating on in the entryway, the living room & hallway as well. We kind of decorated after we got married and then stopped. We have 2 total pictures of Middle A hanging on our walls. All of the photos in our house are of Big A. I'm thinking Middle A will notice one of these days and feel left out if I don't get a move on and start hanging up more pictures.  Plus, I'll be even more behind when Little A arrives because that's one more kid to include. Yikes! Pictures of D and I wouldn't be so bad either. I am envisioning lots and lots of black & white photos in black frames of all different sizes hanging all over my house. I want to do some decorative things among the frames as well. I've gotten some great ideas from Pinterest. I'm sure you can see some on my boards. The colors may not necessarily be what I want, but I'm creative enough to change things up.

Hopefully I'll have a tutorial to show off next time you stop by. I'm tossing the idea of opening an etsy shop around in my head. I'll keep you all updated on that. 

Maybe some super-cute headbands for next time????

Thursday, September 15, 2011

Blackout Panel Tutorial

I can't really make a trumpet sound with text (how would you do that? Bur bur bur?) Anyway, here is the much anticipated and long awaited blackout panel tutorial! I finally got Iphoto fixed on my computer so I could fix my pictures and such. I'm hoping I took enough to make the tutorial easy to follow. I made them weeks ago, so I can't remember now how many I took. 

Let's get started!

First, you need to measure your window and decide what size curtain you want. My window is 35"x60".  I wanted my curtain to measure 42"x72". 

**During the tutorial, 'material' refers to the fabric you're making the curtain out of, 'blackout' refers to the blackout material. I will not be speaking of both at the same time.**

For the material, we're going to add 4" to the width and 6" to the length.  
So my material needed to measure 46"x78".

Lay out your material on the floor and measure your length. I put a mark on the left and right sides so I could later match the marks when I folded it in half to cut.


Here you see I folded the fabric in half and matched the marks I made to each other to ensure I was cutting at the same height all the way across. 


Here is a picture from above. You can see the cutting mat below, the material folded in half, and my cutting ruler is clear but you can see the glare....I promise it's there.


And cut! 


Next, cut your material to the correct width. I skipped taking pictures here because it is the same: measure & cut.

Next, we're going to cut the blackout. This is going to measure 2" wider and 4" longer than you want your curtain. I wanted my curtain to measure 42"x72", so my blackout measured 44"x76".  

I hope you don't mind if I skip the measure and cut parts again. It's really repetitive. Here is my blackout after I finished measuring & cutting.


Put your blackout aside and get your material again. Lay it out flat on the floor. You're going to go around the entire piece of fabric, except for one of the short sides. That 'unfolded' side will be the top of your curtain.  Fold the other 3 sides in 1" and pin it.  


 Here is after I pinned. It's neatly folded and pinned all the way around, except for the top. 


Now lay your blackout on top of the material. It should line up right inside the seams you folded in. Place it all the way to the bottom right up to the fold. Do not overlap it. You will have more material at the top than blackout.  It's hard to see in this picture, but there is no overlapping anywhere around the edges. The blackout simply meets up with the material.
(Also, for whatever reason, blogger won't let me upload the lightened and rotated version of this picture. GRRR!)


Now you're going to go all the way around the 3 folded edges again (yes, again!) and fold it in another inch and pin. You will be overlapping the blackout this time. It is tedious work to remove each pin, fold, and repin. It's worth it in the end though. It will make your curtain look neat and straight.


Here is mine after overlapping and pinning. Don't mind that pen mark at the bottom of my curtain. Ava decided it was a blank canvas for her art work. Luckily it was disappearing ink. 


Now we're going to take it to the sewing machine!
Start at one of your corners. I sew the bottom first. Line up the side of your presser foot with the edge of your material.
Be sure to backstitch so as to make sure it doesn't come undone. 


Follow along with the presser foot at the edge of the material.


This is what it will look like on the front when you're done stitching: 


Here is what the back will look like:


Stitch the two remaining folded sides following the same directions. 

When you're finished with that, you should have 3 finished sides and one 'raw' side (the top). 
Either serge or zigzag stitch across the top edge to keep it from fraying later on. 


Here is what the top of your curtain should look like:


Fold down the top 1", pin & sew--just like you did the other sides before.


See the 1" seam?


Fold down the top and overlap 3" down.  Pin & sew, just as before.


Are you still with me? Great! You're done! 

Unfortunately, I didn't get a picture of just the curtain hanging up, but I have some action shots of the 'Big Reveal of the Big Sister Suite'.  You can see this blackout curtain hanging in the background, plus other curtains I made for Big A's closet. Those are not blackout, but I used the same concept.

See the blackout curtain?

Curtains for the closet:


I hope everything was clear enough to understand! If you have questions or need clarification on any of the steps, leave a comment and I'll help you out!


I promise, it's coming!

I have been so busy with birthdays, bedroom transitions with the kids, and preparing for Little A's arrival in 8 short weeks (eek!) that I feel like I'm standing in the middle of one of those merry-go-rounds we used to play on at the park. You know, the ones that are practically banned from public parks for being too dangerous? They must be in the same place as all the swings and monkey bars.  
Anyway, I did finish the blackout curtain. I do have photos for a tutorial. HOWEVER, for some reason Iphoto is not working on my Mac. I am beyond furious because I have TONS of photos (which are not lost, just will not load!). It's my main tool for sorting, editing, and posting photos. Now I have to figure out which of my Mac-using friends can help me restore my photo library because I've tried everything Google comes up with. >siiiigh<

As soon as I rectify this situation, I will share with you my wisdom of making blackout curtains. I promise!
Saturday, August 20, 2011

I do what I want...

I don't have the blackout curtain tutorial for you yet because I haven't made it. I've been crazy-busy cleaning out and reorganizing the contents of the once-playroom, now empty, future Big Sister Suite...aka Big A's bedroom.  Her birthday is in 10 days, so I'll be making it soon, I promise. 


In the meantime, have a little morsel of sweetness from my life. No, it has nothing to do with sewing or crafting, but it's my blog and I do what I want. 


Over the last few days, I've had a major victory.....at least it's what us moms of toddlers would call a victory.  Middle A has been wearing big girl panties all day with the exception of nap time and night time, with no accidents! We even went out to eat and shopping tonight, accident free!!! Seriously, if you don't have kids, you won't appreciate this at all. Considering she turns 18 months old tomorrow, I'm seriously proud of her! Plus, I think that earns me major Mommy Points! Whatever the heck that is....I just made it up, because seriously, us SAHM's should earn points redeemable toward spa visits and mani/pedi's, without having to pay for it. Also, since Little A is due in early/mid November, I'm pretty happy about this. It wouldn't cost me extra to have 2 in diapers since we use cloth, but it'll be a heck of a lot easier on me!  Now I have to keep my fingers crossed in hopes that Middle A doesn't regress once the baby arrives. 


Today I spent a good chunk of the day shopping for everything we need for Big A's Big Sister Suite. This kid is seriously spoiled and there should be a law against it. She is getting a complete room makeover and her own bathroom at the ripe old age of SEVEN! I didn't get my own bathroom until I bought a house....and even now I have to share it with D. Anyway, we have to set her room up since her birthday is coming up fast. Guess what I'll be doing this week!!!


Oh, one more thing. Since I am currently suffering from this evil thing called pregnancy insomnia (it exists, I swear!) and I absolutely cannot fall asleep at a decent hour, I'm blogging while Middle A watches The Princess and the Frog. D and Big A are camping out in a tent built beside our bed. Do you remember the days when you used every blanket, chair, and random piece of furniture in the house to make the biggest tent you could? That was seriously fun. If you never did that as a child, you missed out. Tonight we just did a simple tent consisting of two blankets, a couple of chairs and our bed. It is totally functional and fits both of them, just not as 'fancy'.  When it was finished (Uncle Matt, you'll LOVE this!) Big A said to D, "It's not like the ones Buddy builds." Poor Daddy. Buddy must hold the title for 'Building the Biggest, Coolest Tents Out of Household Items'.  I don't know, but D told her to sleep in her room since she didn't like it and she immediately decided it would do for the night. Here's a picture for your viewing pleasure. 


Friday, August 12, 2011

No-Sew Tutu

Here's a simple tutorial showing how to make a no-sew tutu.
(Ok, I admit there is a little bit of sewing, but it can be done by hand if need be).
Directions are below each picture.


Here's what you need:

 Tulle in whatever colors you want to use. To make things easier, I always buy the rolls of tulle from Hobby Lobby (see them there behind the tulle piles?). They just so happened to be on sale 50% off this week. I cut it in half, creating 3-inch strips. Then I cut the strips to double the length I want the tutu to be since you have to fold them in half. I had PLENTY left over from what I cut here after making this tutu for a little girls's first birthday (so a 12-18mos size). 
You also need elastic for the waistband. I used 3/4" knit elastic. 
I measure the child's waist (or find a piece of clothing in that size and measure the waist) and subtract about 2 inches from it. When you pull the tulle tight as you put it on, it stretches the elastic. It will be big enough, I promise!
I overlap it about an inch and zig-zag stitch on my machine over each end. I did it with black thread so you could see. I always go back and forth a few times to be sure it's secure. There's going to be a child pulling on this and don't want it to come apart.
Fold a piece of tulle in half and pull the loop above the elastic.
I tried to lighten up this picture, but for some reason it won't let me upload the lightened one. 
Put the loose ends of your tulle through the loop creating somewhat of a slipknot. 
If you want it to be extra fluffy, you can do 2 strips together instead of a single strip.
Pull it tight (but not extremely, since the tighter you pull the more your elastic expands).

Keep going in whatever pattern you like for your tutu. 
If you are getting toward the end and realize it's stretching too much, you can always trim out some elastic and resew it shut. 
Voila! 
I bought a headband and flower to match this one. 

Wednesday, August 10, 2011

But, Mooommmm!!! I don't want to eat my carrots!

If you have kids, you've heard something similar to ^that^ more than once before, I'm sure.  Considering Big A loves carrots and Middle A can't speak in complete sentences yet, I didn't hear it once at dinner tonight. Do you know why? Because I am the one who hates carrots. Yes, me. I don't set a great example when it comes to eating my fruits and veggies. I'm a meat and starch kind of girl. I love a juicy steak cooked medium with potatoes and crunchy green beans smothered in butter and pepper!  <---See? I can eat veggies! I'm just picky.

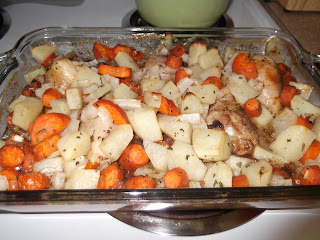
Aaaaanyway....I tried a new recipe tonight that D complimented multiple times (and he doesn't usually eat carrots, either!) and was devoured by our girls. I wanted to share it with you since it's so delicious. 

I know it's not sewing, but cooking is putting different things together with your hands, so I'll call it a craft. 

Maple-roasted Chicken with Vegetables


Ingredients:
1 1/2 lbs Chicken thighs or drumsticks 
Poultry seasoning
Salt & Pepper
Parsley
Basil
2 cups Carrots-cut into 1-in. pieces
3 cups Potatoes-peeled & cut into 1-in pieces
 1/2 Onion-cut into 1-in. pieces
3/4 cup Maple syrup
2 Tbsp Olive oil

Preheat your oven to 375F.

Cut up all of your vegetables and put them in a bowl large enough to stir them or toss them around in. 
Add the maple syrup and olive oil and stir (or toss) until the veggies are coated.

Put your chicken in a 9x13 baking dish. Season it to your liking with the poultry seasoning, salt & pepper. 
Put your vegetables into the dish around the chicken, then pour the sauce from the bottom of the bowl over the top.
Add the parsley & basil, seasoned to your taste.
Cover the dish with foil and bake for 30 mins.
Remove the foil and stir the vegetables, then cook it for 20 more minutes or until the chicken is cooked thoroughly. 

Voila! You have a delicious dinner! 
You're welcome. 


Tuesday, August 9, 2011

Where has all the zebra print gone?!?!?

I am absolutely baffled by the shortage of zebra print in my area. I went to Joann's and two Hobby Lobbies yesterday to find the fabric needed to make Big A's blackout panel. She wants zebra print. Shouldn't be hard to find, right? It's always there when I'm not looking for it. 


I went to Joann's first and the guy there said that a lady came in and ordered 300 yards of it!!!! 300 yards!!!!  I would like to know what on God's green earth could you possibly need 300 yards of zebra print cotton for??? I'm picturing this lady and her house like Cruella DeVille on 101 Dalmations, except with zebra stripes instead of dalmation spots. I wonder if she has black & white hair, too? 


I went to two different Hobby Lobbies and I guess the crazy zebra lady got to them, too. I swear she's on a mission to stop me from making this curtain! So I guess Wal-Mart is my last option for now. Hopefully they'll have it there. I really would like to strike this off of my list of 'Things to Do for Big A's  Room Makeover'. 


On an unrelated note, we spent an hour at the second Hobby Lobby looking at Halloween costume patterns, and then Big A ultimately decided that she would dress up in a very cute outfit of Halloween colors instead of having an actual 'costume'. She also wants Middle A to match. Since Middle A is not old enough to care, I'm fine with that decision. It's easier on me with the impending arrival of our third princess (or diva, or drama queen....whatever my girls are this week). Be on the lookout for a no-sew tutu in the near future. 
Monday, August 8, 2011

Wow. It's so early....

As I sit here waiting for the school bus with Big A, I'm debating whether I should go back to bed when she leaves or head out to Joann's for fabric. Middle A was running a fever yesterday, so she's sleeping soundly even through Big A talking unreasonably loudly for 6:30 am. I guess Mario Kart Wii is exciting.

I'll be putting together a blackout curtain for Big A's new bedroom. Yes, 'new' bedroom. She's getting a bedroom makeover for her birthday and moving downstairs into the 'Big Sister Suite'.  Lucky kid will have her own bathroom. Mommy doesn't even get that. I have to share with Daddy. 

I'll take pictures as I sew, so you can follow along on a tutorial in case you want to make a blackout panel anytime soon. 

I have also thought about posting a second repurposing tutorial on turning a women's T-shirt into a girl's T-shirt. The shirt I used for my first tutorial was kind of a special situation, in which I didn't have to do a lot of modifications. It was a pretty easy one to do.  Big A is already asking me for another new shirt and since I have a bag full to repurpose, I'll probably do it soon.

I have lots of ideas spinning around in my head, so check back every few days for new posts. You might catch some pictures of my pocket diapers or prefold covers, too! (Still debating on whether to do a tutorial for those...). 

See you soon!!
Sunday, August 7, 2011

Up-cycling a Women's Shirt Into a Girl's Dress (or shirt).


I love going to places like Goodwill and finding cheap clothes to up-cycle for my girls! I went today and bought some, so of course I had to make a dress for Big A as soon as I got home! I confess I get a little over-excited when I have a project in mind. I have to do it RIGHT THEN and finish it.  It's not always a good thing. It usually results in late nights.....not tonight though!  Tonight I'm up at 1AM posting a blog because I know how important it is for you to know how to do this! I know you're just dying to get to the good stuff! So, here it is: 

This is the shirt I picked up for $4.95. It's an Anne Taylor LOFT women's size Medium. I have absolutely no clue what kind of fabric this is (I'm a newbie at sewing, so I have yet to learn what everything is called).  It is very thin, but it wasn't hard to work with. 


Since I'm a beginner at sewing myself, I tried to make these instructions as clear as possible for newbies. If you have any questions, feel free to post them in the comments below!

The first thing I did was cut the sleeves off with my rotary cutter. I made sure to cut right below the seam so it came off with the sleeves. 

Next, I folded the shirt in half and lined up the edges. I picked a shirt out of Big A's closet that fits her well and folded it in half also. Line the folded edges and the neckline up together. Cut beside the shirt, leaving about 1/4" for a seam allowance. 

 As you can see below, I did not cut across the bottom. You can cut across the bottom if you want to make a shirt. By not cutting mine, I made it into a dress.

You should have 2 pieces of fabric now: a front & a back. Unfold the shirt and lay the front on top of the back, right sides facing. You should be looking at what will be the inside of the front of the shirt. Pin each side together. Obviously you will NOT pin at the arm holes. Start just below there. 


Sew a straight stitch along the edges of both sides of the shirt. 


When you are finished with the straight stitch, you can either serge (if you own a serger) the raw edges together, or you can zig zag stitch if you only own a regular machine.  I do not own a serger, so I zig zag stitch and let my needle fall on the outside of the raw edge of the fabric so it finishes it off.  When you are doing this, be sure your zig zag stitch does NOT overlap your straight stitch. Keep it to the outside. 


Here is what my finished edge looks like:


At this point, I had to take a break for a very sleepy little girl who just woke up from her nap. She needed mommy time. 


Ok. Now for my very unscientific and unprofessional way to measure for the sleeves. 
I cut the sleeves apart so they would lay flat. I just cut them at the bottom center seam.  

On my sleeves, there was a short side and a long side. (You can see this better 2 pictures down). 

The short side was the side that needed to hold the shirt up, so I put the shirt on Big A, held the sleeve where it needed to be on the front, and marked where it met the shirt on the back. I then cut it about 1/2" past there to allow for the seams on the front and the back when I sew it on.

(If you look right at the middle of the top elastic, you can see my mark).

Since there was elastic on the bottom of my sleeves and I didn't want to deal with it, I just cut it off and hemmed the raw edge:


This is what it looked like when I was finished hemming:


Here, I matched up the short side of the sleeve to the front. (See above, the left side is shorter than the right).  Be sure you're matching up your raw sides at this point, and NOT your finished sides. Pin them with right sides facing, sew a straight stitch, then zigzag or serge. 


You're going to repeat that with the back of this sleeve, then do the same on the other side.
Here is what it should look like when you finish each side of your sleeve:


If you chose to cut yours shorter and make a shirt instead of a dress, you need to hem the bottom edge of your shirt now. 
Since I left mine long, no hem was needed because I didn't cut it off. 


Here is the finished product!


I used some of the scraps I cut off at the beginning and made her a hair bow and a flower to wear on the front of the shirt.

Here is my little model, Big A.


ENJOY!!!

Related Posts Plugin for WordPress, Blogger...
 

Blog Template by BloggerCandy.com