Monday, January 30, 2012

February is coming!

I don't ever really make New Year's resolutions. I'm not going to make one now since it will be February in 2 days.  There are a few things that I want to work on improving, though. My goals for the next few weeks.  

--Create a schedule for myself to follow throughout the day so I can be more productive at home. 

--Try to get Little A on a more steady schedule and have her and Middle A napping at the same time during the day. 

--Set aside time each morning for a cup of hot chocolate and my Bible Study. 

--Cook healthier meals, using more natural ingredients and less prepackaged and processed junk.

--Try to find time a couple of days a week to work on sewing projects.

_________________________________________________

With that being said, or typed....our February is going to be very busy!

--We're finishing up our Upward Basketball season. 

--Middle A turns 2!

--We will be celebrating our 3rd Anniversary.

--Little A will be getting christened.

--I'll be coordinating the Financial Peace University class at our church.

I'll be keeping you guys updated with the progress of my goals over the next couple of weeks. Hopefully I'll get some yummy recipes posted for you soon. I have put a few new ones on our menu for the next two weeks. I'll definitely share them with you...if they come out right, that is!

Sunday, January 29, 2012

Birthday Cake and Sneaky Unicorns

Since I seriously love this picture of D, I had to share him with his birthday cookie. It was lovingly made by me. I painstakingly opened the roll of cookie dough, sprayed the pan, pressed it in there and baked it. It was hard work but I somehow managed.

I sure do love that man....

_______________________________________________________________________

This morning, after I had already posted my blog about our date night and my craftiness, I was getting ready for church and I heard Middle A yelling, "Mess! Mess!"

This is what I found:
Don't you just love the flowery pajama bedhead cuteness!?

That's the glittery, liquidy (<---that's evidently not a word, but it's my blog and I say what I  want) insides of a toy baton. She was playing with it and snapped off the end somehow. Funny, the first thing that popped into my head when I saw the glittery puddle was 'Unicorn Pee!'   So I told Middle A that a unicorn must have snuck into her room. Of course, she has no idea what I'm talking about, because she had just made this mess herself and the very idea that mom would think a unicorn had been in her bedroom was absolutely absurd.  So she just looks at me like I'm some kind of crazy. It would have been funnier if Big A was home. Hmph. 

Monogram Canvases

 I made a lot of our Christmas gifts homemade this year. I thought I would share one with you. I made this craft for my sister-in-law (here's her blog: Entirely Elizabeth) I won't post a tutorial because it's pretty simple: you paint.  I used tape to create the straight lines. I got the inspiration from these two pictures that she pinned on her Pinterest board: 


She liked the monogram canvasses in this one.

 She liked the colors in this one. 


So, I combined the two ideas and came up with this. She actually hung them in her bedroom, so I'm assuming she likes them. Haha!


 I will say that I actually went to Home Depot and bought the little sample cans of Behr Premium paint to do this because it only cost $2.99 for each color. I am positive I would have spent that much on the paint I would have gotten at the craft store. Plus, this project used so little paint that Elizabeth has it now to paint anything she finds that she may want to coordinate with these canvasses.

I'll post more craftiness in a day or two. For now, I need to start getting myself and my girls ready for church! Happy Sunday!
Friday, January 27, 2012

The Chocolate To My S'mores

Happy Birthday to my very wonderful, amazing, patient, intelligent, kind, loving husband. 

D turned 30 today. I need to go buy him a walker now, I guess. Really though, I have six more years of the twenty-somethings so I get a kick out of teasing him about his age. He knows I love him and he's the perfect man for me. He's the milk to my cheerios, the cheese to my macaroni, the peanut butter to my jelly, the syrup to my pancakes. He's my real-life Romeo. 

Yeah, I seriously love the guy. I would honestly be lost without him. He and I literally complete each other. Where one of us lacks in certain areas, the other makes up for. 
He hasn't said much about turning 30. The most I've ever heard him say about it is that he wants to have all of our kids before he turns 30. Well, that didn't happen. We aren't finished having kids yet. I don't know if it's actually realistic to set goals like that. I think life happens too often in between the time you set the goal and the 'ending' time. 

We haven't decided how many kids we'll have, but we know we aren't finished. People always ask if we're going to keep trying until we have a boy. I think that is a ridiculous and utterly absurd question to ask. I think anyone who is having kids until they have the desired gender is having children for the wrong reason. 
My second favorite question is, "What if you have all girls?" Well, uh.....DUH!!!! We'll have all girls. Do you think the last one is gonna come out with a big banner and a party hat, blowing on a vuvuzela in celebration of having all girls??? Come on now!

Stay tuned for tomorrow's update. Maybe you'll get a nice picture of D and myself dressed up to go on a birthday date. Maybe not...who knows? 
I'm thinking a Brazilian restaurant will be fun!

Thursday, January 26, 2012

How 'Crunchy' Am I?


For those of you who don't know what a crunchy person is, it's another word people use in  place of the term 'granola'. Crunchy people generally prefer green or natural products. They alter their lifestyles usually for environmental reasons. I am not a very crunchy person, but the more I learn about natural products and ways to help the environment while saving money for our family, the crunchier I get. 
One of the main things that our family does to help the environment and save money is cloth diapering. When I first told people I was switching from sposies to cloth, I got a huge spectrum of reactions from all kinds of people. One of my favorites was, "What the heck are you going to do with the poop?" Of course, that included a very disgusted face as the person imagined me wrestling a poopy diaper. I would respond with, "It goes in the toilet, just like if you were potty training a toddler and she had an accident. You shake it off and rinse." By the way, did you guys know you're supposed to dump poo out of sposies before you throw them away? I'm pretty sure no one does that. 
I would also get comments like, "Won't that make your water bill go up? So you wouldn't really be saving money, right?" Well, yes. My water bill did go up. It went up by about $2.00. If you add in the cost of detergent and baby wipes, I spend about $5-$6/month diapering my children. Middle A is potty trained, but she still wears a diaper to bed, so she wears 7 a week. Little A wears the rest. I think the price I pay is definitely favorable, as opposed to $10/pack for sposies. 
Knowing that I am keeping nasty sposies out of landfills makes me feel good about the choice that I have made. It takes a sposie somewhere between 250-500 years to decompose. I have read varying reports on this, but even if 250 is correct....imagine how many diapers ONE child goes through and how long it would take for just that ONE child's diapers to decompose. Now multiply that by about a billion. Yeah. That is one very large number. 
Here is a website for your reading pleasure: Why Choose Cloth Diapers?
A lot of people see the initial investment number for cloth diapers and it scares them. There are so many options out there, from cheap to very expensive. I have seen cloth diapers for as low as $5 and I have seen some custom made sell for $250. Ridiculous, I know. The bottom line is, if you want to look into cloth diapering for your family, do your research first. It IS affordable! Even if you didn't go for the cheapest diapers out there, an investment of $300 is still less than what you'll spend from your child's birth to potty training. Remember, as your child grows, there are less diapers in each package as the size increases. They still cost the same though! You can buy cloth diapers that will fit from newborn all the way up to about 35lbs! Middle A and Little A share diapers. Middle A will be 2 next month and weighs close to 30lbs. Little A is almost 11 weeks old and weighs just under 14lbs. Talk about a money saver! 
One of the ways we keep the cost of cloth diapers down at our house is by making them. I ordered some cheap pocket-style diapers to start with. I took a good look at them and decided I could make them myself. It's actually relatively easy to do. Here are a few examples of what I've made:


The one on the right in this photo is actually a diaper cover. It is used over prefold diapers. Those are the ones our parents used on us. I am about to make some of those homemade as well. I'll post a tutorial as soon as I'm finished. If anyone needs to be pointed in the direction of more information on the different types of cloth diapering, I will be more than happy to answer questions to the best of my knowledge.

New Year, New Baby, New Beginning!

So the new baby came in mid-November. She's almost 11 weeks old now but that's still new, right? We will call her Little A. Add that to Big A, Middle A & Mommy A, and that makes 4 girls with 'A' names in our house.  We were not planning on naming all of our girls with names that begin with A. We just liked the name we chose for our second daughter, and we let Big A name our newest addition. We liked the name she chose, so we rolled with it. 


Isn't she beautiful?

I decided to change the name of my blog so I am not restricted to writing about any one subject. I thought 4 A's and a D was appropriate. So, with a new title came a new layout and viola! It's all brand new! I'll continue to post tutorials & recipes, but I will also be posting things that are not about crafting and cooking. Hopefully my (what? 12?) followers will enjoy! 
Friday, October 28, 2011

Easy DIY Halloween Decorations

This year, I have decided that I'm decorating for the holidays. I mean, REALLY decorating for the holidays. I want our home to feel festive--starting with Halloween! The only problem is, we don't have a never-ending supply of money, so I have to find cheap or free ways to decorate our home. These happened to be free since I already had the supplies lying around the house. 


First, we have spooky ghosts and bats! We made about 15 of these to hang around the house. 


I went online and found a free coloring sheet with the kind of bat & ghost I wanted. I had to adjust the size a little bit to make them larger. 
I used a heavy piece of cardboard (not the corrugated kind) to cut them out of. 
We painted them with washable paint. 


I went back after the kids were done and added a second coat of paint to make them look a little bit darker. 
When they were done drying, I added faces to the ghosts with a sharpie. 
I used an awl and poked a small hole in the top of each one and tied a piece of fishing line to them so we could hang them. 
We hung them in the entryway, living room, hallway & kitchen! 
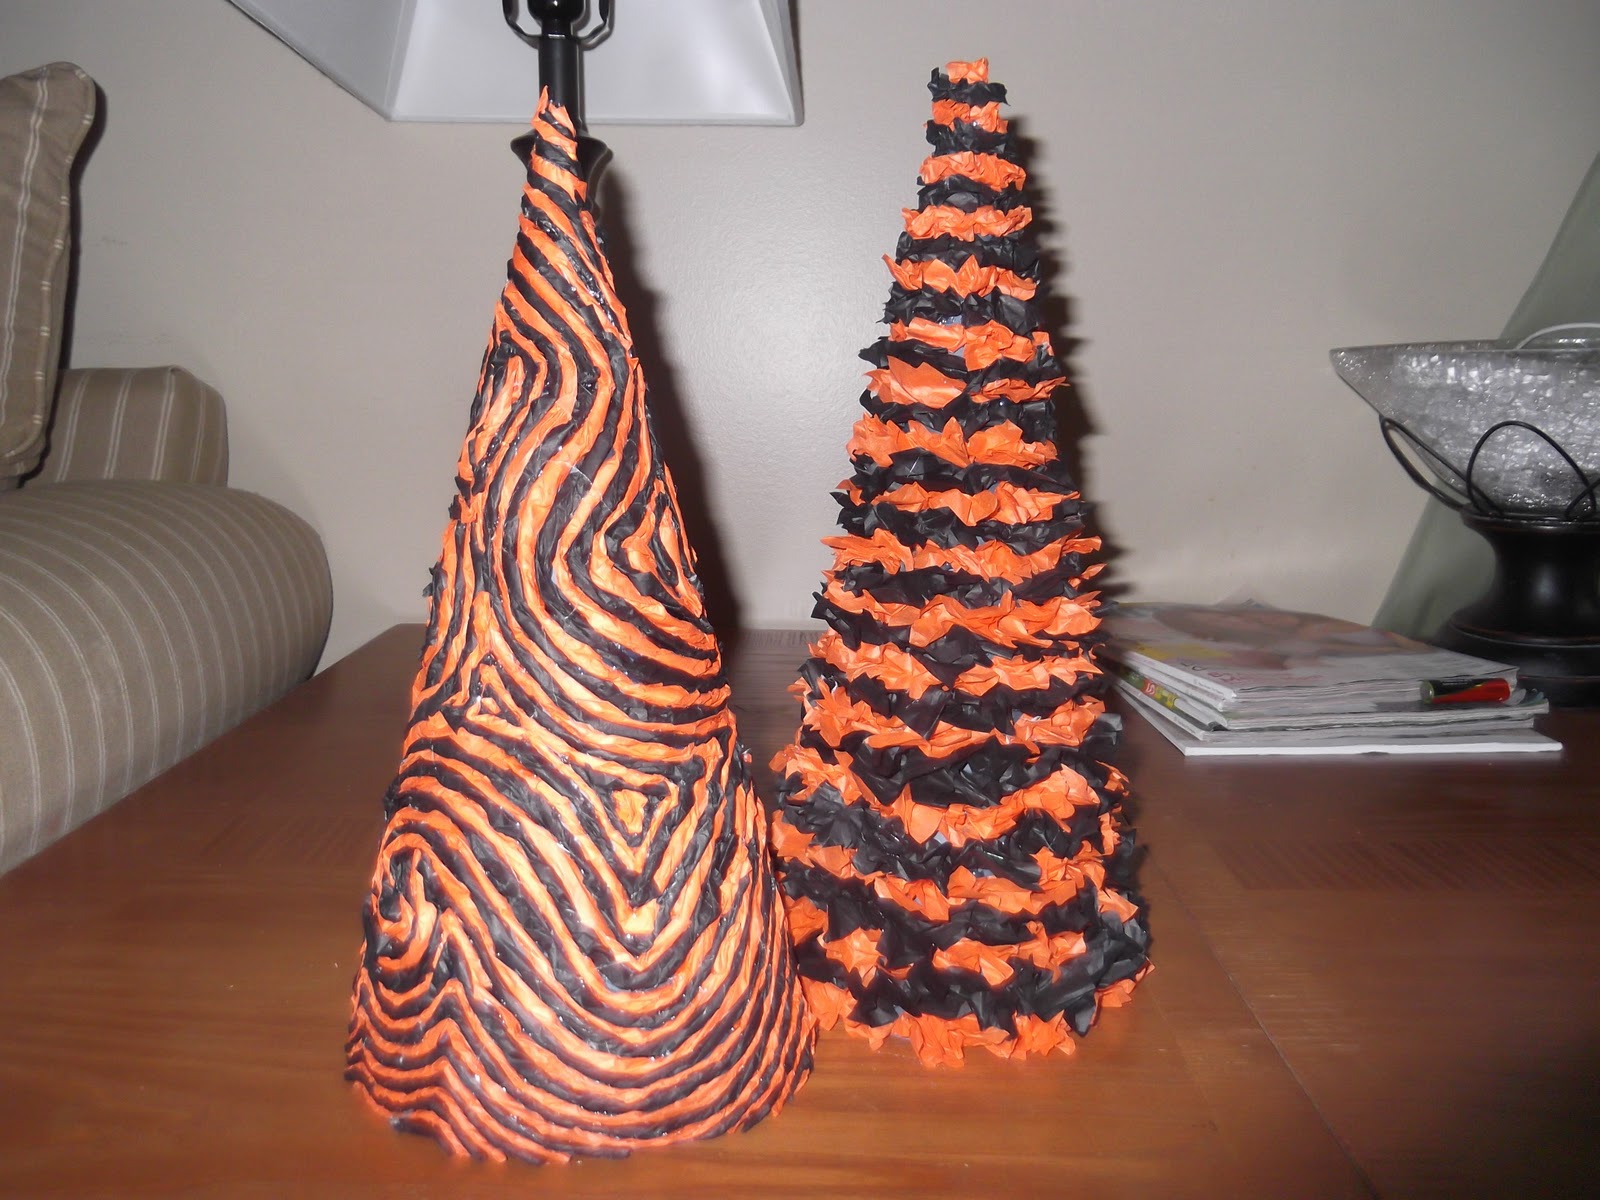
___________________________________________________________________

Halloween Trees

You can use just about anything to make these and you can make them for any holiday! 


For these, you will need scissors, tissue paper, cardstock, clear tape, and hot glue. 

We'll start with this one:

First, make your cone out of cardstock. 
Tape it in place. 
I just rolled it into a cone shape and trimmed the bottom so it would sit upright. 


Next, I cut the tissue paper into lots of squares. They were about 1"x 1".
Scrunch them up and glue them around the bottom of the cone. 
You can glue them in whatever pattern you like. 

You'll have to excuse the mess....I'm a multi-tasker. 
Keep going up the cone. Glue the tissue paper very closely together.
Try not to let the paper underneath show.
Progress! Keep going....

Viola! Finished!
____________________________________________________________

Now on to the next Halloween Tree!


Make a cone out of cardstock again. 
This time, cut your tissue paper into strips and twist them. 


You're going to start with a 'guide' strip. Glue on your strip in whatever design you want. I went with a crazy random swirl. You want it to go all the way around and from top to bottom. This is going to be the strip you use to guide you as you glue on more. You may have to use more than just one piece of tissue paper, depending on how long you cut each strip. 

Here's my 'guide strip'. 
Notice how it starts on one side and you can see it goes all the way around.

Next, you're going to glue your orange strip right next to it. Follow your guide strip as you glue. 
Keep the pattern going...black, orange, black, orange.


Progress! Keep going!

Keep going until the whole thing is filled up!

Finished!
________________________________________________________

Here is a picture of our Halloween trees and some ghosts and a bat decorating our mantle. 


Related Posts Plugin for WordPress, Blogger...
 

Blog Template by BloggerCandy.com