Showing posts with label DIY. Show all posts
Wednesday, December 12, 2012

DIY Headband Holder

You know that song “Little Girls” that Miss Hannigan sings in the musical ‘Annie’? Sometimes I find myself humming that song. Having 3 girls, our house is covered in little girl things. I step on a hair clippy at least 10 times a week. Moms of boys think Legos hurt?! I stepped on my share of legos when I was younger. Legos got nothin’ on those little claw-shaped hair clips. OUCH! Along with those hair clips, we have about 10 bajillion hair bows and headbands. The tiny drawer in the bathroom can’t hold them all. Headbands were breaking and bows were getting smashed. I know a hair bow board will solve the smashed hair bow problem. I’m going to take care of that soon. I needed to figure out how to get all those headbands in one place.

This is the answer:


An oatmeal canister is the perfect size to put headbands around!

I trimmed two pieces of scrapbook paper to fit around the can and hot glued them.

Then, I hot glued a ribbon down each side where the paper overlapped so no edges were showing.

Last, I glued a cardboard circle that is about an inch wider than the base of the canister to the bottom.


Middle A insists on wearing a headband every single day, so it’s great having them all right there where she can choose which one she wants. It’s also handy for teaching her to put them where they belong. She is doing a great job keeping up with her headbands since they’re all displayed on her dresser now. 

Here are Middle A’s headbands on her headband holder:


Thursday, September 6, 2012

A Wired Welcome

I’ve been doing some crafty little DIY’s lately, but I lost my digital camera charger, so I have been taking pictures with my cell phone. (BOOOO!!!!!)


I’ve been working on decorating our entryway. Here is the shelf I recently added:


The shelf is a Goodwill find, I painted the canvas, and also made the welcome sign.
I’ll share details about the shelf and canvas later. 

Today, I’m going to share with you how I made the Welcome sign.


I wanted something simple to put on the shelf in my foyer since it isn’t a large space. 
It was pretty easy. The worst part was how sore my hands were after working with wire for a few hours. 

Here’s what you need:


You don’t really need two different gauges of wire, but I used both. It was easier to wrap the thinner wire around the spots where I had to join the hangers together to better secure the link, and then cover it with the thicker wire.

Untwist your hangers and use the pliers to help you form the word you want to use.


It’s ok if it isn’t perfect. When you wrap the wire around it, you can better shape or smooth your letters.

Start wrapping the wire around your hanger word. 
Continue wrapping it around, covering the hanger as completely as possible.


Continue wrapping the wire around until you’ve completely covered your word. 


I know it’s not as perfect as something I could buy at the store, but I like that about my DIY’s. It gives them character. 


Thursday, May 3, 2012

Drawing Pad & Pencil holder


A very special little girl in my life turned three in March. I wanted to make her something special, so I pulled my chair up to the sewing machine and got busy! Using the tutorial from Skip to my Lou, I whipped up this cute drawing pad & colored pencil holder. 
I've seen crayon rolls before, but I didn't want to do that. I wanted her to have something she could take everywhere with her. Here in Georgia, if you leave a crayon roll in the car for longer than 10 mins, your crayons will have melted by the time you get back. I think colored pencils are the way to go. 


With this tutorial, if you're going to turn & topstitch like I did, make sure you lengthen the width of your inner and outer fabrics by 1" to 1.5". I did the tutorial exactly as it said and my pencils were too long for it to close evenly. Evidently her tutorial doesn't account for lost space in the pencil slots if you turn & topstitch. Just a heads up there.


I will be making these for just about every kid I know, I think. I really like these. I like the convenience. I like that I can personalize them, and I like how easy the tutorial is to follow.
Give it a try! 

Tuesday, May 1, 2012

Big Red Ottoman

One of the many joys of having pets and children is that just about every piece of furniture in your house gets abused. Our ottoman used to be the place that Lola, our golden retriever/yellow lab mix, would lay. She's currently staying with my parents, but that's a post for another day.  Anyway, she created this giant tear in the middle of my ottoman. She also made the top of it very dirty and gross. I was ready to throw the thing out, but my husband likes to kick up his feet after a long day so he wouldn't let me. I decided to sew a cover for it instead. 

Do you see how stinkin' gross this thing is!?

There was no fixing this tear without stitching showing.

I decided to cover it in the fabric I'm going to [eventually] cover my couches with. I found this great tutorial online that shows how to recover your couch. I can't wait to do it!


I chose a red microsuede. It's machine washable and wipes clean easily.

As we were walking around JoAnn's looking for the right fabric, my mother-in-law suggested that maybe just buying new furniture would be easier and/or cheaper. In some cases, it would be, but I get 40%-50% off coupons from JoAnn pretty regularly. That makes it more affordable for me.


In the end, it only cost me about $30 to recover the ottoman. I'm sure that's way cheaper than buying a whole new one. I'm pretty confident that I can recover my sofa and love seat for $200 or less.

Wednesday, March 21, 2012
I'm a pretty crafty person. 
I love making things with my hands.
Sewing, crafting, building, cooking.
I just like creating things. 
It's getting harder and harder to sit down for long periods of time since I have 3 kiddos. It takes me forever to make things that should only take an hour or two, unless the kids are sleeping. 

Anyway, here are some things I've made lately. 


A couple of reversible headbands and a cute flower headband. 
I really think that I love those reversible headbands. They're super easy to make and you get two headbands in one. I made the green ones for my girls for St. Patty's Day.     

One of my close friends wants me to make her some of the flower bands to match her daughter's Matilda Jane clothes. I think they will be cute with that line. MJ is a very cute label. I just can't fork over the money for it, having 3 girls to dress! OUCH!


These are some prefold diapers I made. They're made with 2 layers of flannel and a strip of terry cloth in the middle. They're very easy to make. Little A was outgrowing the cotton prefolds I have, so I had to come up with something new. These work like a charm. They just stain like no other. I need to put up a clothes line so I can hang them out in the sun. 


Last is this khaki vest I made for Big A.
It is parent/teacher conference week, so of course it's also book fair week. 
They always hit you up for money when they know they have you  coming into the school. 
Anyway, there is a different theme for each day. The kids get to dress up in accordance with the theme. 
Today is Tacky Tourist day. Big A isn't one to look tacky when she's supposed to.  She evidently has no problem looking tacky any other day of the week, but not on the day she's supposed to. So she went to school all matchy matchy, but I think she looks tourist-y enough. Right?
I made the vest out of an old pair of khaki pants I found on the shelf in my closet. There are pockets on the front, but you can't really see them in the picture. It only took me a couple of hours to make (in between breastfeeding and changing diapers) so it was relatively simple. Big A really liked it, so that's a win in my book!

Don't forget, there are only 3 days left to enter my giveaway!

Monday, February 20, 2012

Coasters & a new 'do.

Last week, I got tired of my hair and decided it needed to be cut. 
So I cut it. 
Myself. 
This is the most recent picture of the length, although it seems a bit shorter in this picture since it's curled. 
(I used the headband no-heat curling method to get these messy curls).


Here is what it looks like now. I put some subtle layers in it and cut my bangs.  
I have the top layers pulled back in this photo.


I'm going to share another gift I made for my IL's for Christmas. 
There are DIY photo coaster tutorials all over the internet.
I decided to try it. 
I made my IL's a set of coasters with their grandchildren's photos on them.


It was super cheap & easy!

I'll put the steps below, but if you would rather see a photo tutorial, google it. There are tons of them out there.

Use 4x4 tiles from HD or Lowe's. 

Cut your photos a little bit smaller than the tile, as I did.

Put a layer of Mod Podge (found at Wal-Mart and craft stores) on the tile.

Place your photo on the wet mod podge, being careful not to create air pockets.

Let it dry for a few minutes (it doesn't take long).

Put a couple of layers of mod podge over the entire surface of the photo and tile, one at a time letting them dry in between each application.

Spray each tile with a waterproof sealer (found at HD or Lowe's). 

Glue a 4x4 square of felt to the bottom of each tile.  

Thursday, February 16, 2012

DIY Drawer Dividers

I am one of those people whose belongings all have a 'home'. 
Everything has a place. 
Whether it makes it there or not is a different story. 
I'm always looking for ways to get organized (and hopefully stay that way).
One of the most disorganized places in our house is each of our underwear drawers.
I keep all of my undergarments in the same drawer. 
I do the same for our girls. There's no need for socks and undies to be in separate drawers. 
Unfortunately this makes for a messy, disorganized drawer. 

Here is the solution.

You need:

Measure the dimensions of your drawer. You need depth, length & width.


Cut pieces of cardboard to those sizes. 
For this drawer, I wanted 4 compartments. 
I cut 2 end pieces & a center piece all the length of the drawer, as well as a cross piece the width of the drawer. Be sure you measure the depth inside the drawer, not the front of the drawer.


Notch each piece where you want them to cross. 
I wanted these to cross in the center, creating equal spaces. 
Be sure your notch is half the width of the board.


Notch the ends of the long piece on the same side you did the center notch.


Place your end & center pieces in with the notches facing up.
Then place the cross piece in with notches facing down. 

Note: It may not seem like it, but the end pieces are important. If you do not use them, the divider will just move around when you put things in the drawer. 


Voila! 
You have a homemade drawer organizer!


Wednesday, February 8, 2012

A smile...

Once again I'm going to mention the addictive site that is Pinterest. It has inspired me to decorate my house. I am in the process of adding more photos to the walls. I also want to add canvases with inspirational quotes or nice sayings on them. 
We have lived in this house for three and a half years but decoration is minimal. I want it to feel lived in and full of love. 
Speaking of love, D and I need to have some photos taken of just the two of us to hang in our bedroom. There are no photos of the kids in there. The rest of the house has pictures of our whole family or pictures with only the kids in them. The master bedroom is for us. No, this doesn't mean I don't love my kids. It means I want a space exclusively for celebrating the love that my husband and I have for each other. 

Soo....getting back on track here. 

I made this quick canvas to hang in Big A's bathroom. She's getting to an age where the little girls can be meaner than piranhas in a tank full of fresh meat. I want her to always be confident. I think this will be a good reminder. 
I just used sharpies to do this one. Since the color scheme in her bathroom is black, white & red, I figured a simple black & white would do. 


It's not perfect, but it's for a 7 year-old. I think it will do. 
Sunday, January 29, 2012

Monogram Canvases

 I made a lot of our Christmas gifts homemade this year. I thought I would share one with you. I made this craft for my sister-in-law (here's her blog: Entirely Elizabeth) I won't post a tutorial because it's pretty simple: you paint.  I used tape to create the straight lines. I got the inspiration from these two pictures that she pinned on her Pinterest board: 


She liked the monogram canvasses in this one.

 She liked the colors in this one. 


So, I combined the two ideas and came up with this. She actually hung them in her bedroom, so I'm assuming she likes them. Haha!


 I will say that I actually went to Home Depot and bought the little sample cans of Behr Premium paint to do this because it only cost $2.99 for each color. I am positive I would have spent that much on the paint I would have gotten at the craft store. Plus, this project used so little paint that Elizabeth has it now to paint anything she finds that she may want to coordinate with these canvasses.

I'll post more craftiness in a day or two. For now, I need to start getting myself and my girls ready for church! Happy Sunday!
Friday, October 28, 2011

Easy DIY Halloween Decorations

This year, I have decided that I'm decorating for the holidays. I mean, REALLY decorating for the holidays. I want our home to feel festive--starting with Halloween! The only problem is, we don't have a never-ending supply of money, so I have to find cheap or free ways to decorate our home. These happened to be free since I already had the supplies lying around the house. 


First, we have spooky ghosts and bats! We made about 15 of these to hang around the house. 


I went online and found a free coloring sheet with the kind of bat & ghost I wanted. I had to adjust the size a little bit to make them larger. 
I used a heavy piece of cardboard (not the corrugated kind) to cut them out of. 
We painted them with washable paint. 


I went back after the kids were done and added a second coat of paint to make them look a little bit darker. 
When they were done drying, I added faces to the ghosts with a sharpie. 
I used an awl and poked a small hole in the top of each one and tied a piece of fishing line to them so we could hang them. 
We hung them in the entryway, living room, hallway & kitchen! 
___________________________________________________________________

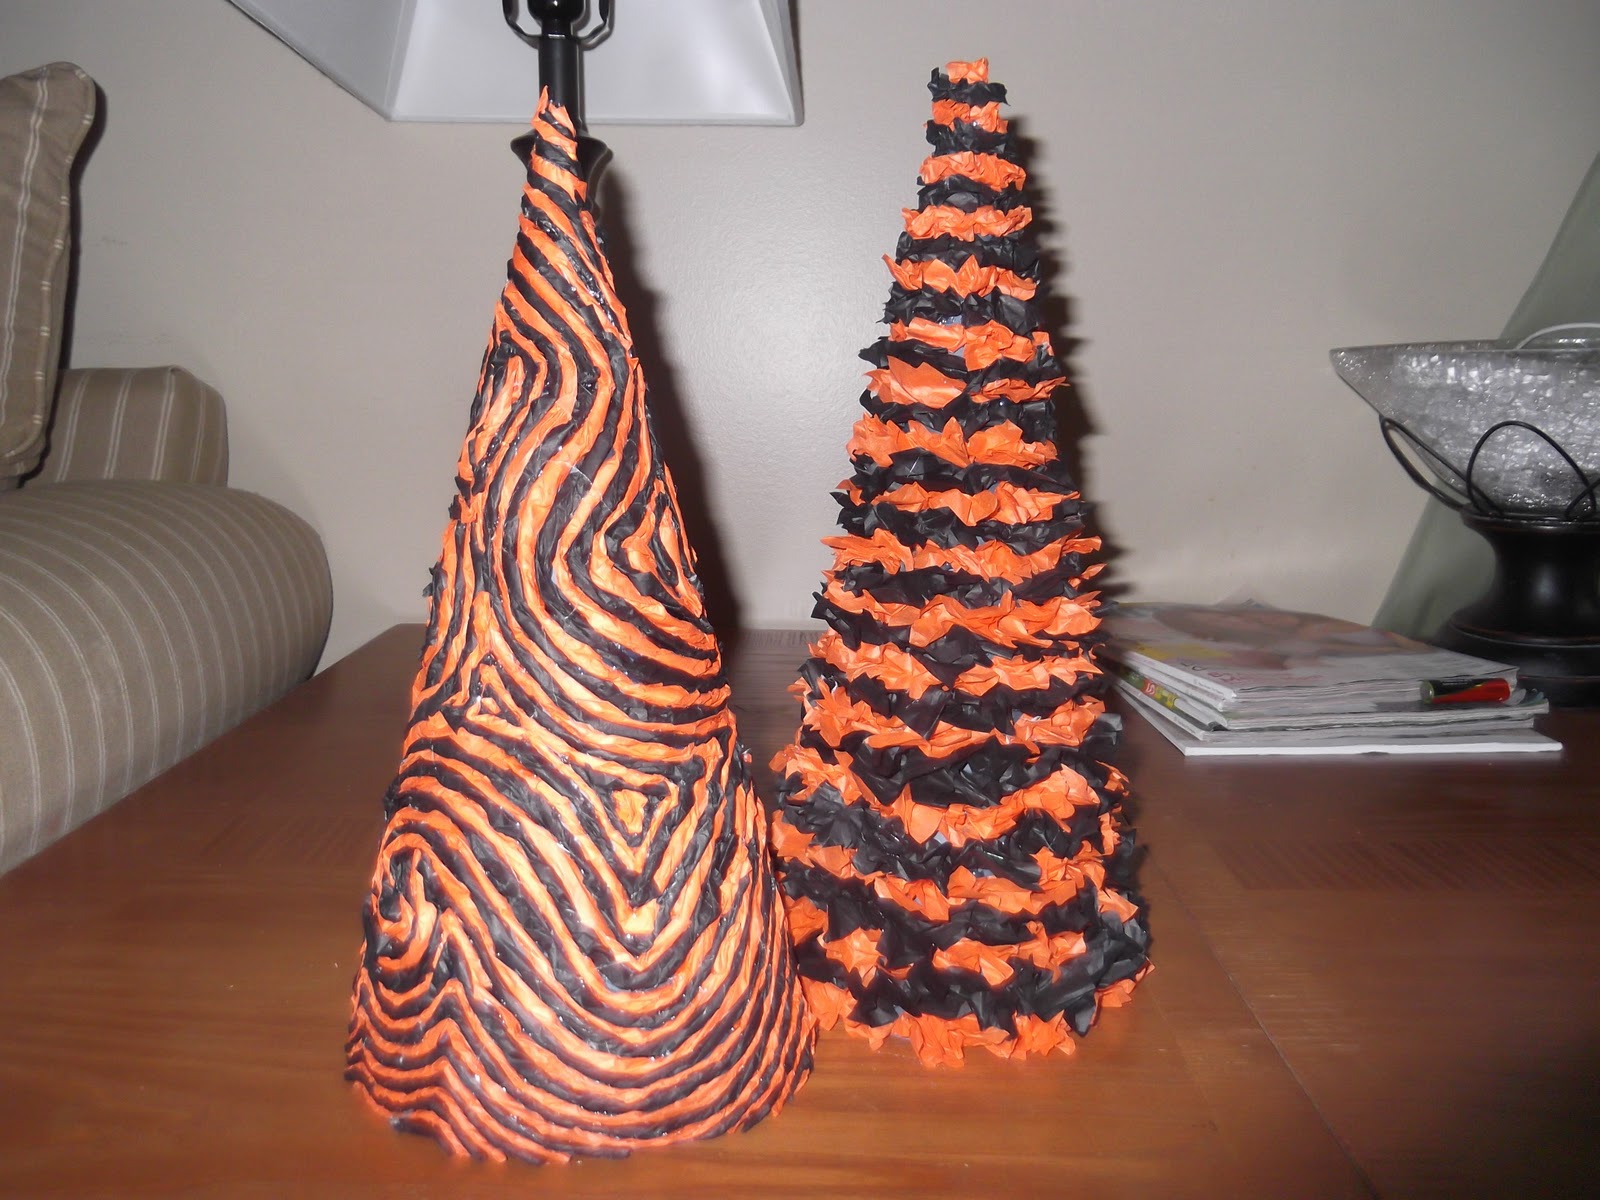
Halloween Trees

You can use just about anything to make these and you can make them for any holiday! 


For these, you will need scissors, tissue paper, cardstock, clear tape, and hot glue. 

We'll start with this one:

First, make your cone out of cardstock. 
Tape it in place. 
I just rolled it into a cone shape and trimmed the bottom so it would sit upright. 


Next, I cut the tissue paper into lots of squares. They were about 1"x 1".
Scrunch them up and glue them around the bottom of the cone. 
You can glue them in whatever pattern you like. 

You'll have to excuse the mess....I'm a multi-tasker. 
Keep going up the cone. Glue the tissue paper very closely together.
Try not to let the paper underneath show.
Progress! Keep going....

Viola! Finished!
____________________________________________________________

Now on to the next Halloween Tree!


Make a cone out of cardstock again. 
This time, cut your tissue paper into strips and twist them. 


You're going to start with a 'guide' strip. Glue on your strip in whatever design you want. I went with a crazy random swirl. You want it to go all the way around and from top to bottom. This is going to be the strip you use to guide you as you glue on more. You may have to use more than just one piece of tissue paper, depending on how long you cut each strip. 

Here's my 'guide strip'. 
Notice how it starts on one side and you can see it goes all the way around.

Next, you're going to glue your orange strip right next to it. Follow your guide strip as you glue. 
Keep the pattern going...black, orange, black, orange.


Progress! Keep going!

Keep going until the whole thing is filled up!

Finished!
________________________________________________________

Here is a picture of our Halloween trees and some ghosts and a bat decorating our mantle. 


Related Posts Plugin for WordPress, Blogger...
 

Blog Template by BloggerCandy.com